3.3 Building a Microservice
Understand the setup and build your own order microservice.
Stock Microservice
The order and stock microservice have a similar setup.
Therefore, we will only work on the order microservice.Order Microservice
We have already finished the specification of our environment in the docker compose file. Now we will write our order microservice.
As an overview this is the final structure of the order microservice at the end of the tasks in this section. You will be guided the implementation of these in the next steps.
 1
 2
 3
 4
 5
 6
 7
 8
 9
10
11
12
13
14
15
16
17
18
19
20
21
22
23
24
25
26
27
28
29
30
31
| .
├── pom.xml
└── src
└── main
├── docker
├── java
│ └── ch
│ └── puzzle
│ └── mm
│ └── rest
│ ├── order
│ │ ├── boundary
│ │ │ └── ShopOrderResource.java # Order RESTful API
│ │ ├── control
│ │ │ └── ShopOrderService.java # Business code
│ │ └── entity
│ │ ├── ArticleOrderDTO.java # Entities and DTOs...
│ │ ├── ArticleOrder.java
│ │ ├── ShopOrderDTO.java
│ │ ├── ShopOrder.java
│ │ └── ShopOrderStatus.java
│ └── stock
│ └── boundary
│ └── ArticleStockService.java # Stock REST-Client
└── resources
├── application.properties # Application Properties
├── db
│ └── changeLog.xml # Database migration
└── META-INF
└── resources
└── index.html # Static webpage
|
Datasource and database schema
First we are going to setup the database connection and tables.
Task 3.3.1 - Setup database dependencies
Limited lab duration
This step is already implemented. For a better understanding we encourage you to have a quick read but you may also skip it.
Ensure the following dependencies are specified in the pom.xml.
| GroupId | ArtifactId | Description | Detailed information |
|---|
io.quarkus | quarkus-hibernate-orm-panache | Hibernate ORM with Panache support | Simplified Hibernate ORM with Panache |
io.quarkus | quarkus-liquibase | Liquibase Quarkus integration for database schema change management | Using Liquibase |
io.quarkus | quarkus-jdbc-postgresql | JDBC PostgreSQL support for Quarkus | Datasources |
Dependencies Task Hint
Ensure the following dependencies are in your pom.xml. Dependency quarkus-hibernate-orm-panache is already added.
 1
 2
 3
 4
 5
 6
 7
 8
 9
10
11
12
13
14
15
16
17
| <dependencies>
...
<!-- database dependencies -->
<dependency>
<groupId>io.quarkus</groupId>
<artifactId>quarkus-hibernate-orm-panache</artifactId>
</dependency>
<dependency>
<groupId>io.quarkus</groupId>
<artifactId>quarkus-liquibase</artifactId>
</dependency>
<dependency>
<groupId>io.quarkus</groupId>
<artifactId>quarkus-jdbc-postgresql</artifactId>
</dependency>
...
</dependencies>
|
After adding these dependencies, we are ready to configure quarkus to use the database.
Add the following configuration to the application.properties file.
 1
 2
 3
 4
 5
 6
 7
 8
 9
10
11
12
13
14
| # datasource
quarkus.datasource.db-kind = postgresql
quarkus.datasource.username = admin
quarkus.datasource.password = 1234
quarkus.datasource.jdbc.url = jdbc:tracing:postgresql://localhost:5432/admin
quarkus.datasource.jdbc.driver=io.opentracing.contrib.jdbc.TracingDriver
quarkus.hibernate-orm.dialect=org.hibernate.dialect.PostgreSQLDialect
# drop and create the database at startup (use `update` to only update the schema)
quarkus.hibernate-orm.database.generation = none
# liquibase properties
quarkus.liquibase.migrate-at-start=true
quarkus.liquibase.clean-at-start=true
|
This will defines our data source connection and specify that Liquibase should clean and migrate the database schema at start up.
Task 3.3.2 - Setup database schema
Limited lab duration
This step is already implemented. For a better understanding we encourage you to have a quick read but you may also skip it.
Let’s build the database schema with liquibase.
- Create folder
src/main/resources/db - Create file
src/main/resources/db/changeLog.xml
You have to use the liquibase XML syntax to create the tables and sequence. You may find some details here:
For details about the supported data types in postgres, please check the PostgreSQL Data Types
page.
You can use the following template:
 1
 2
 3
 4
 5
 6
 7
 8
 9
10
11
12
13
14
15
16
17
18
19
20
21
22
23
24
25
26
27
28
29
30
31
| <?xml version="1.1" encoding="UTF-8" standalone="no"?>
<databaseChangeLog xmlns="http://www.liquibase.org/xml/ns/dbchangelog"
xmlns:ext="http://www.liquibase.org/xml/ns/dbchangelog-ext"
xmlns:xsi="http://www.w3.org/2001/XMLSchema-instance"
xsi:schemaLocation="http://www.liquibase.org/xml/ns/dbchangelog-ext
http://www.liquibase.org/xml/ns/dbchangelog/dbchangelog-ext.xsd
http://www.liquibase.org/xml/ns/dbchangelog
http://www.liquibase.org/xml/ns/dbchangelog/dbchangelog-3.5.xsd">
<changeSet author="main" id="1">
<!-- simple table -->
<createTable tableName="TABLENAME">
<column name="PKNAME" type="PKTYPE">
<constraints primaryKey="true" nullable="false"/>
</column>
<column name="NAME" type="TYPE"/>
</createTable>
<!-- relation table -->
<createTable tableName="TABLE1_TABLE2">
<column name="TABLE1_id" type="TABLE1_PKTYPE">
<constraints nullable="false" foreignKeyName="FK_TABLE1_NAME" referencedColumnNames="id"/>
</column>
<column name="TABLE2_id" type="TABLE2_PKTYPE">
<constraints nullable="false" foreignKeyName="FK_TABLE2_NAME" referencedColumnNames="id"/>
</column>
</createTable>
<createSequence sequenceName="SEQUENCE_NAME" startValue="STARTVALUE"/>
</changeSet>
</databaseChangeLog>
|
Naming
Please be precise with the naming of tables and fields. If you name
things differently you may run into trouble in later steps.Create the shoporder table in changeLog.xml according to the details below. This table will store our orders.
1
2
3
4
5
6
7
8
9
| admin=# \d shoporder;
Table "shoporder"
Column | Type | Collation | Nullable | Default
--------+------------------------+-----------+----------+---------
id | bigint | | not null |
status | character varying(255) | | |
Indexes:
"shoporder_pkey" PRIMARY KEY, btree (id)
|
Create the articleorder table in changeLog.xml according to the details below. This table reflects the effective
articles which have been ordered.
 1
 2
 3
 4
 5
 6
 7
 8
 9
10
| admin=# \d articleorder;
Table "articleorder"
Column | Type | Collation | Nullable | Default
-----------+---------+-----------+----------+---------
id | bigint | | not null |
articleid | bigint | | |
amount | numeric | | |
Indexes:
"articleorder_pkey" PRIMARY KEY, btree (id)
|
Create the mapping table in changeLog.xml according to the details below. This table is used to build the mapping
from shoporder to the articleorder. Define any needed foreignKeyName yourself.
1
2
3
4
5
6
| admin=# \d shoporder_articleorder;
Table "shoporder_articleorder"
Column | Type | Collation | Nullable | Default
------------------+--------+-----------+----------+---------
shoporder_id | bigint | | not null |
articleorders_id | bigint | | not null |
|
Finally, create a hibernate sequence in changeLog.xml according to the details below.
1
2
3
4
5
| admin=# \d hibernate_sequence;
Sequence "hibernate_sequence"
Type | Start | Minimum | Maximum | Increment | Cycles? | Cache
--------+--------+---------+---------------------+-----------+---------+-------
bigint | 100000 | 1 | 9223372036854775807 | 1 | no | 1
|
Task Hint
Your changeLog.xml should look like this:
 1
 2
 3
 4
 5
 6
 7
 8
 9
10
11
12
13
14
15
16
17
18
19
20
21
22
23
24
25
26
27
28
29
30
31
32
33
34
35
36
37
| <?xml version="1.1" encoding="UTF-8" standalone="no"?>
<databaseChangeLog xmlns="http://www.liquibase.org/xml/ns/dbchangelog"
xmlns:ext="http://www.liquibase.org/xml/ns/dbchangelog-ext"
xmlns:xsi="http://www.w3.org/2001/XMLSchema-instance"
xsi:schemaLocation="http://www.liquibase.org/xml/ns/dbchangelog-ext
http://www.liquibase.org/xml/ns/dbchangelog/dbchangelog-ext.xsd
http://www.liquibase.org/xml/ns/dbchangelog
http://www.liquibase.org/xml/ns/dbchangelog/dbchangelog-3.5.xsd">
<changeSet author="main" id="1">
<createTable tableName="shoporder">
<column name="id" type="bigint">
<constraints primaryKey="true" nullable="false"/>
</column>
<column name="status" type="varchar(255)"/>
</createTable>
<createTable tableName="articleorder">
<column name="id" type="bigint">
<constraints primaryKey="true" nullable="false"/>
</column>
<column name="articleid" type="bigint"/>
<column name="amount" type="number"/>
</createTable>
<createTable tableName="shoporder_articleorder">
<column name="shoporder_id" type="bigint">
<constraints nullable="false" foreignKeyName="shoporder_article_shoporder_fk" referencedColumnNames="id"/>
</column>
<column name="articleorders_id" type="bigint">
<constraints nullable="false" foreignKeyName="shoporder_article_articleorder_fk" referencedColumnNames="id"/>
</column>
</createTable>
<createSequence sequenceName="hibernate_sequence" startValue="100000"/>
</changeSet>
</databaseChangeLog>
|
Entities and Data Transfer Objects (DTOs)
The next step is to define our Domain Entities and DTOs. For our order microservice we will need
the following entities:
ShopOrder: The entity representing an orderArticleOrder: The entity representing an ordered article and its order countShopOrderStatus: An enum representing the status of the order
We will trigger a new order using a RESTful API call to our order microservice. For this we will use DTOs instead of
entities. Define the following DTOs:
ShopOrderDTO: A DTO to specify which articles have been ordered with this order.ArticleOrderDTO: A DTO to specify the article id and the amount of items ordered.
Task 3.3.3 - Implement entities
Limited lab duration
This step is already implemented. For a better understanding we encourage you to have a quick read but you may also skip it.
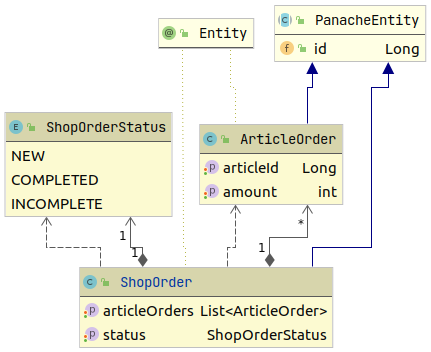
Entity overview of the order microservice.
PanacheEntity
We are using the Quarkus Hibernate ORM with Panache extension. The
classical approach with the EntityManager would work as well and might be required for complex use cases. However, in
our simple implementation we will make use of Panache. For more information about Panache have a look at:
Simplified Hibernate ORM with PanacheWe will create our entities in src/main/java/ch/puzzle/mm/rest/order/entity.
- Implement enum
ShopOrderStatus - Implement entity
ArticleOrder- Implement the default Constructor and a Constructor with both fields as arguments.
- Implement entity
ShopOrder- Annotate
articleOrders with @OneToMany(cascade = CascadeType.ALL) - Annotate
status with @Enumerated(EnumType.STRING)
- Do not forget to annotate the entities with
@Entity and extending from PanacheEntity which provides us the id.
ShopOrderStatus enum Task Hint
1
2
3
4
5
| public enum ShopOrderStatus {
NEW,
COMPLETED,
INCOMPLETE,
}
|
ArticleOrder Entity Task Hint
 1
 2
 3
 4
 5
 6
 7
 8
 9
10
11
12
13
14
15
16
17
18
19
20
21
22
23
24
25
26
27
28
29
30
| @Entity
public class ArticleOrder extends PanacheEntity {
Long articleId;
int amount;
public ArticleOrder() {
}
public ArticleOrder(Long articleId, int amount) {
this.articleId = articleId;
this.amount = amount;
}
public Long getArticleId() {
return articleId;
}
public void setArticleId(Long articleId) {
this.articleId = articleId;
}
public int getAmount() {
return amount;
}
public void setAmount(int amount) {
this.amount = amount;
}
}
|
ShopOrder Entity Task Hint
 1
 2
 3
 4
 5
 6
 7
 8
 9
10
11
12
13
14
15
16
17
18
19
20
21
22
23
24
25
26
| @Entity
public class ShopOrder extends PanacheEntity {
@OneToMany(cascade = CascadeType.ALL)
private List<ArticleOrder> articleOrders;
@Enumerated(EnumType.STRING)
private ShopOrderStatus status;
public ShopOrder() { }
public List<ArticleOrder> getArticleOrders() {
return articleOrders;
}
public void setArticleOrders(List<ArticleOrder> articles) {
this.articleOrders = articles;
}
public ShopOrderStatus getStatus() {
return status;
}
public void setStatus(ShopOrderStatus status) {
this.status = status;
}
}
|
Task 3.3.4 - Implement DTOs
Limited lab duration
This step is already implemented. For a better understanding we encourage you to have a quick read but you may also skip it.
The following JSON corresponds to the POST Request body which is received by the order microservice. It reflects both
DTOs ShopOrderDTO and ArticleOrderDTO.
 1
 2
 3
 4
 5
 6
 7
 8
 9
10
11
12
| {
"articleOrders" : [
{
"articleId" : 1,
"amount" : 1
},
{
"articleId" : 2,
"amount" : 3
}
]
}
|
Implement both DTOs according to the given JSON. Put them in the same folder as the entities.
- Implement
ArticleOrderDTO- set fields public, getters and setters are not needed
articleId: use Long as typeamount: use int as type
- Implement
ShopOrderDTO- set field public, getters and setters are not needed
articleOrders: use List as type
ArticleOrderDTO Task Hint
1
2
3
4
| public class ArticleOrderDTO {
public Long articleId;
public int amount;
}
|
ShopOrderDTO Task Hint
1
2
3
| public class ShopOrderDTO {
public List<ArticleOrderDTO> articleOrders;
}
|
Building a Business Service for processing new orders
Processing of a new order will be handled by to the ShopOrderService.
Task 3.3.5 - Create service for order creation
Create the following ShopOrderService class in src/main/java/ch/puzzle/mm/rest/order/control
 1
 2
 3
 4
 5
 6
 7
 8
 9
10
11
12
13
14
15
16
17
18
19
| @ApplicationScoped
public class ShopOrderService {
@Transactional
public ShopOrder createOrder(ShopOrderDTO dto) {
ShopOrder shopOrder = new ShopOrder();
shopOrder.setStatus(ShopOrderStatus.NEW);
// create order articles
List<ArticleOrder> articleOrders = dto.articleOrders.stream()
.map(s -> new ArticleOrder(s.articleId, s.amount))
.collect(Collectors.toList());
shopOrder.setArticleOrders(articleOrders);
shopOrder.persist();
return shopOrder;
}
}
|
Building a Rest Client for the Stock Microservice
For calling our stock microservice we have to define a RESTful client. For a straightforward implementation we will
use the MicroProfile:
- MicroProfile Rest-Client: Provides us a very simple way of creating rest clients by simply writing an
interface using proper JAX-RS and MicroProfile annotations
Task 3.3.6 - Rest Client
Limited lab duration
This step is already implemented. For a better understanding we encourage you to have a quick read but you may also skip it.
Ensure the following dependencies are specified in the pom.xml.
| GroupId | ArtifactId | Description | Detailed information |
|---|
io.quarkus | quarkus-rest-client | Implementation of MicroProfile REST Client | Using the Rest Client |
Dependencies Task Hint
The following dependencies have to be added.
1
2
3
4
5
6
7
8
| <dependencies>
...
<dependency>
<groupId>io.quarkus</groupId>
<artifactId>quarkus-rest-client</artifactId>
</dependency>
...
</dependencies>
|
Task 3.3.7 - Define the Rest Client
Create the rest client by implementing a RestClient-Interface. Since this is a
boundary service the interface goes in src/main/java/ch/puzzle/mm/rest/stock/boundary.
- Create the interface
ArticleStockService - Annotate the interface with
@RegisterRestClient(configKey = "article-stock-api") - Annotate the interface with
@Path("/article-stocks"). This matches the RESTful endpoint on the stock microservice. - Define the
orderArticles method in ArticleStockService- Use annotations like
@POST, @Produces and @Consume as you would do in a RESTful endpoint. - The method takes a
List<ArticleOrderDTO> as argument
ArticleStockService Task Hint
1
2
3
4
5
6
7
8
9
| @Path("/article-stocks")
@RegisterRestClient(configKey = "article-stock-api")
public interface ArticleStockService {
@POST
@Produces(MediaType.APPLICATION_JSON)
@Consumes(MediaType.APPLICATION_JSON)
Response orderArticles(List<ArticleOrderDTO> orders);
}
|
Use the following configuration in application.properties to define where our client will connect to
1
2
3
4
| # ArticleStock API
application.articlestock.api.url: http://localhost:8081/
article-stock-api/mp-rest/url: ${application.articlestock.api.url}
article-stock-api/mp-rest/scope: javax.inject.Singleton
|
JSON RESTful Web Services
Our Microservice will provide a RESTful API to create and list existing orders. For this we need to create a JAX-RS resource.
The implementation is pretty straightforward. Define a ShopOrderResource in src/main/java/ch/puzzle/mm/rest/order/boundary endpoint and use the JAX-RS annotations.
Below is a very simple implementation of a json rest service supporting GET and POST requests for http://<host>:<port>/shop-orders. For further details have a look at the Quarkus Guide Writing Json Rest Services
.
 1
 2
 3
 4
 5
 6
 7
 8
 9
10
11
12
13
14
15
16
17
18
| @Path("/shop-orders")
@ApplicationScoped
@Produces(MediaType.APPLICATION_JSON)
@Consumes(MediaType.APPLICATION_JSON)
public class ShopOrderResource {
@GET
public List<ShopOrder> list() {
return null;
}
@POST
@ChaosMonkey
@Transactional
public Response createShopOrder(ShopOrderDTO shopOrderDTO) {
return null;
}
}
|
Task 3.3.8 - JSON RESTful Resource
The ShopOrderResource is a boundary class and will be placed in src/main/java/ch/puzzle/mm/rest/order/boundary. Implement it according
to the simple sniped above.
- Inject the
ArticleStockService to trigger the stock microservice - Inject the
ShopOrderService to process the new order- Annotate the
ArticleStockService with @RestClient to tell Quarkus that this is a rest client.
- Implement
@GET which returns all ShopOrders- Our entities are PanacheEntities and support the Active Record Pattern. They do provide handy static methods like
listAll().
- Implement
@POST method to create a new order- Annotate the method with
@Transactional and @ChaosMonkey - Use the injected
ShopOrderService to create the order - Use the injected
ArticleStockService to trigger the stock handling - After triggering the stock service, set the order status to
COMPLETED - Return the ShopOrder
GET Method Task Hint
1
2
3
4
| @GET
public List<ShopOrder> listAll() {
return ShopOrder.listAll();
}
|
POST Method Task Hint
1
2
3
4
5
6
7
8
9
10
11
12
13
14
| @POST
@ChaosMonkey
@Transactional
public Response createShopOrder(ShopOrderDTO shopOrderDTO) {
// create ShopOrder locally
ShopOrder shopOrder = shopOrderService.createOrder(shopOrderDTO);
// call remote service
articleStockService.orderArticles(shopOrderDTO.articleOrders);
shopOrder.setStatus(ShopOrderStatus.COMPLETED);
return Response.ok(shopOrder).build();
}
|
Complete Task Hint
1
2
3
4
5
6
7
8
9
10
11
12
13
14
15
16
17
18
19
20
21
22
23
24
25
26
27
28
29
30
31
32
33
| @ApplicationScoped
@Path("/shop-orders")
@Produces(MediaType.APPLICATION_JSON)
@Consumes(MediaType.APPLICATION_JSON)
public class ShopOrderResource {
@Inject
@RestClient
ArticleStockService articleStockService;
@Inject
ShopOrderService shopOrderService;
@GET
public List<ShopOrder> listAll() {
    return ShopOrder.listAll();
}
@POST
@ChaosMonkey
@Transactional
public Response createShopOrder(ShopOrderDTO shopOrderDTO) {
    // create ShopOrder locally
    ShopOrder shopOrder = shopOrderService.createOrder(shopOrderDTO);

    // call remote service
    articleStockService.orderArticles(shopOrderDTO.articleOrders);

    shopOrder.setStatus(ShopOrderStatus.COMPLETED);

    return Response.ok(shopOrder).build();
}
}
|